
GTA 6 missables by chapter
Keep a manual save before each chapter ends and play jobs marked with an hourglass while they’re available. Open your chapter for the earlier cutoffs, including the items you can only pick up at home.
On this page
Chapter 1 · Show spoilers
Keep a separate save slot when Mattia offers you Tourist Trap. Accepting the job starts a run of story missions with no time to explore between them. Some optional jobs close earlier.
Finish the house repairs and buy the necklace at the Siren’s Chest before starting Coming Home. To finish the railing, go down to the exercise equipment and look beside the ladder.
Inside Jason’s house, start at the bedside table for Ashes of Glory. In the living room, read Lethal By Design on the table and Orca A Whole Different Animal by the east window. Body Copy is on the workout deck. Go downstairs into the tool shed for Off the Hook. Open each title. The house copies become inaccessible after the chapter.
After Down to Earth, check the kitchen in the morning. When Lucia goes outside to meditate, follow her and accept the invitation. The interaction expires. Its effect on the Positive Mental Attitude trophy is still unconfirmed. For 100% completion you need 15 meditations.
Finish Get Shirley’s Rum, then return for Steal the Scooter. Both jobs disappear when you leave Chapter 1. You can still finish the game’s optional-task target without them.
During Don Gone, open Donnie’s car trunk before destroying the vehicle. Take Donnie’s H&L .38 if you want this particular revolver.
Before Tourist Trap, collect any money you left under the floorboards and visit an ATM. Choose Family Savings in BuckMe. Money in your pocket, in checking or left at the house does not make the move.
Use the motorcycle under the raised house and the kayak at the water’s edge while you have access to this home. A separate Chapter 1 save lets you return for either vehicle.
| Place | Grid | Where to look | Map |
|---|---|---|---|
| Jason’s house | K6 | The outdoor stairs lead to the living space. The tool shed is underneath the house. | View on mapHouse location |
| Siren’s Chest | K6 | The map shows Key Lento. Look for the jewelry shop in the southwest of the island. | View on mapTown label |
Take the outside stairs up to the front door. The kitchen opens into the living room.
Gameplay by GTA Series VideosChapter 2 · Show spoilers
Make a separate save and finish your motel pickups before starting Checking Out. You can return to the surrounding town later, but these rooms close.
At the Starlet Motel, open Help Me Help You Help Me on the reception table. Walk into the cafeteria and read Wizard Wang on the table there. These are two convenient copies toward the 30-publication target.
Pass reception and enter the office bathroom for Vicki’s card on the floor. In the kitchen, check the refrigerator for Victor Maravilla. Both rooms close at the end of Chapter 2. If you missed Vicki, check the alternate pickup in Peacock Bay.
Delights closes temporarily. The seat in the booth along its east wall can be reached again later. You can leave Harley off your motel run.
| Place | Grid | Where to look | Map |
|---|---|---|---|
| Starlet Motel | E4 | The pin marks the motel building. Use reception for the bathroom card and the kitchen for the fridge card. | View on mapMotel building |
| Delights | E3 | Harley’s card is in a booth on the east side of the club. | View on mapReported pickup area |
| Peacock Bay | I6 | Reported alternate pickup for the Vicki card. The Starlet Motel deadline applies to the motel copy. | View on mapReported pickup area |
Look on the floor beside the toilet.
Gameplay by EmPee HQChapter 3 · Show spoilers
Do the apartment pickups before starting The Cartel Heist. The race invitation can expire much earlier. Answer it when it appears.
At the Bayside apartment, pick up Passion B.C. beside the bath and Two Pricks in the Bush by the television. The apartment closes after this chapter. Both publications can count toward the same reading goal as the motel copies.
After Bumper to Bumper, several in-game days can pass before Jason hears from Yago. Start Race Against Yago when the hourglass appears in Salton. At the meetup, speak to Santiago and choose Freeway Run.
In Dubious Provenance, hand the statue to Halifax if you want the next part. If you decline, use the optional phone objective to call him before Chapter 3 ends. Ignoring the call closes the later jobs. A second decision about trusting him affects the last job.
| Place | Grid | Where to look | Map |
|---|---|---|---|
| Bayside apartment | G7 | The map centers on the Bayside district. Follow the home icon on your game map to the apartment. | View on mapDistrict reference |
| Salton | H6 | The pin marks the district. Follow the time-limited race marker for the meetup. | View on mapDistrict label |
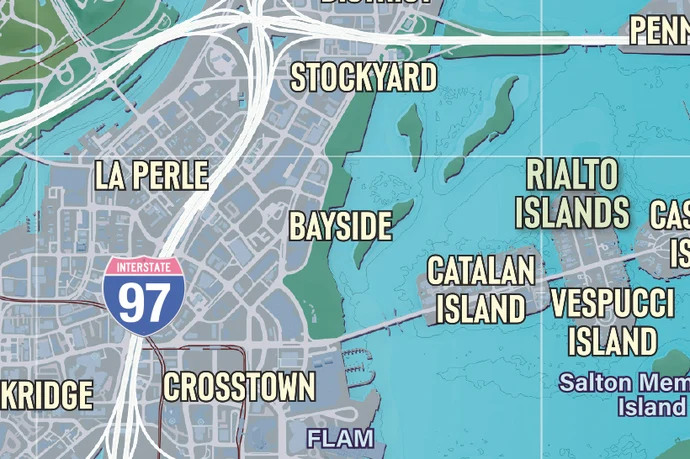 View on map
Chapter 4 · Show spoilers
Keep a separate save after Lawyer Up if you want to play the optional prison pickup. It has a limited window during Chapter 4.
Drive near Hamlet as Lucia after Lawyer Up. When Shayna messages, select This Is a Free Call From… and go to the pickup while its marker is active. You can finish the main story if the invitation expires.
| Place | Grid | Where to look | Map |
|---|---|---|---|
| Hamlet | I5–I6 | Town east of the Grassrivers. Follow the pickup marker to Shayna once the job appears. | View on mapTown label |
Chapter 5 and after the credits · Show spoilers
Before The End of the Road, save in another slot if you want to revisit the finale. There is no mission replay menu. After the credits, use the Progress menu to see what your save still needs.
- For reading, the checklist asks for 30 magazines, books or comics. A closed room costs you its copy. Other copies and titles can still count, so check your reading total before loading an older save.
- For optional jobs, check the 100-task counter. There are more qualifying tasks than the game requires, including jobs available after the story. Older saves are useful when you want to play a particular expired mission.